Are you sushi curious but terrified of the unknown? Don’t worry! Eating sushi can feel intimidating, with foreign ingredient names and unfamiliar customs. But don’t be discouraged! Making sushi is surprisingly easy and even more delicious. Let us be your guide and unveil the mysteries of sushi making with our step-by-step guide to making your first roll. So don your apron, put on your chef’s hat, and let’s get rolling!
Table of Contents
Quick Summary of Key Points
Making your first sushi roll is easier than you may think! Start by gathering your desired ingredients, then roll them into the sushi mat and cut to the desired size. With practice, you’ll become a sushi-rolling pro in no time!
About Sushi: A Traditional Japanese Meal
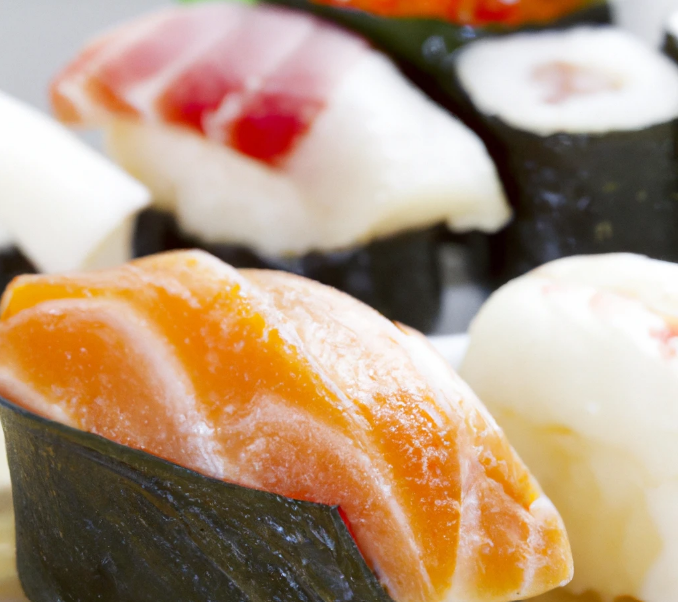
Sushi is a traditional Japanese food made from vinegared rice, commonly accompanied by fish or other seafood. It has become incredibly popular in the last few decades, with sushi being served in restaurants around the world. Sushi originally began as a way of preserving fish, but over time it has evolved into a delicacy enjoyed by many.
There are several schools of thought on the origin of sushi. Advocates of traditional Japanese cooking emphasize its heritage, stating that it originated thousands of years ago in Southeast Asia. Others argue that sushi was heavily influenced by Chinese cooking techniques and dishes brought to Japan centuries ago. No matter where its beginnings lie, sushi is a timeless and beloved food that continues to evolve with modern times.
Today, sushi remains a prominent feature of Japanese cuisine, having dominated the country’s culinary scene for centuries. Not only is it incredibly delicious when done correctly, but it is also quite healthy due to its diverse selection of fresh ingredients. Eating sushi not only brings pleasure to your palate but yields numerous health benefits as well.
As with any cooking method, understanding how to make traditional sushi takes practice and patience. With this guide to sushi for beginners, readers will gain insight into the nuances of making their own rolls and delighting in the deliciousness of their carefully crafted creations. Now let’s look at what ingredients are necessary for making basic sushi…
Essential Highlights
Sushi is a traditional Japanese delicacy that has become popular around the world over the last few decades. Its origin is still being debated, but it is a beloved feature of Japanese cuisine. Eating sushi not only brings pleasure to your palate, but also yields health benefits due to its fresh ingredients. Making sushi can take practice and patience, so this guide offers insight into the nuances of making basic rolls.
What are the Basic Ingredients Needed?
Making sushi can seem daunting at first, but with the right ingredients and some practice, you’ll be able to make beautiful and tasty rolls in no time. The basic ingredients needed to make sushi are as follows: sushi-grade seafood, cooked and seasoned rice, nori seaweed sheets, wasabi, soy sauce, and pickled ginger. Let’s discuss each component of these ingredients in greater detail so you can confidently create your own sushi rolls.
Sushi-grade seafood is essential for making quality sushi. Purchasing whole fish from a trusted source is best. Be sure to read all labels carefully and ask questions about sourcing for the freshest seafood. Once you have purchased the raw seafood of your choice (often salmon or tuna), it’s important to prepare it accordingly for sushi, such as slicing it into thin fillets or preparing sashimi. These preparations will depend on the desired taste and texture of your particular roll.
To make authentic Japanese sushi rice, Japanese short grain white rice must be used in order to properly develop its sticky texture. The rice must also be boiled before cooking and adding other ingredients such as sugar and vinegar. Seasoning the rice is an integral part of making delicious sushi, as the quality of this component is key to achieving flavorful results. Once the seasoning is prepared and mixed with the boiled rice, it can be pressed into shape before being placed inside the nori seaweed sheet (which wraps around the roll).
Nori seaweed sheets are also a critical ingredient for making great tasting sushi; they act as a wrapper for most types of rolls and add flavor complexity to each roll variety. Wasabi paste can give an added kick to traditional maki rolls, while soy sauce adds a mild saltiness that complements many different types of fish. Pickled ginger can provide both flavor and an extra crunchy texture that pairs well with the salty yet subtle flavors of soy sauce.
Now that you know what basic ingredients are needed to make sushi at home, let’s move on to preparing your very first roll! In the next section we will discuss “Preparing Sushi: A Beginner’s Guide”, where we will take a deep dive into how to assemble all of these components together for irresistibly delicious sushi rolls!
Preparing Sushi: A Beginner’s Guide
Before attempting to roll sushi for the first time, it is important to learn about the essential ingredients and tools necessary for making sushi. Since sushi is a combination of fish and vinegared rice, students should be prepared with the right ingredients and cooking equipment when they start.
The most important ingredient in any form of sushi is sushi-grade fish. Sushi grade fish refers to fish that has been stored properly at temperatures low enough to kill parasites and bacteria without sacrificing texture or flavor. Common types of sushi grade seafood include salmon, tuna, yellowtail, and mackeral. When preparing seafood, it is important to note that while freshness is key, cooked seafood can still be used in many kinds so long as it has been kept chilled.
In addition to quality and freshness, the type of rice used for making sushi also makes a big difference in the outcome. To make proper sushi rice, short-grain white rice is preferred due to its stickiness when cooked. To achieve peak stickiness and a crisp yet flavorful taste, combine one cup of uncooked short-grain white rice with two cups of water in a pot over medium-high heat until boiling then reduce to medium-low heat until all the liquid has evaporated. Finally, add one tablespoon seasoned rice wine vinegar per cup of cooked rice for flavor and acidity.
Once the ingredients are all prepped, gathering essential tools like bamboo mats for rolling, knives specifically designed for cutting raw fish, or chopsticks are essential depending on the type of sushi being prepared. Many beginners might find using home kitchen supplies such as plastic wrap or wax paper sufficient enough when starting out.
Getting the Rice Right is an essential step in creating delicious sushi rolls. The next section will discuss methods on how to season, cook, and shape the perfect bed of sticky sushi rice that will bring together all other elements and provides structure necessary to get started on making your first successful piece of Japanese cuisine!
Getting the Rice Right
When it comes to making sushi, getting the rice right is essential. It may seem complicated, but don’t let that intimidate you! Here are all of the steps needed to make perfect, tasty sushi rice.
First, rinse your sushi rice in water for at least 20 minutes. This will ensure that all excess starch is removed from the grains, as this can affect the texture and flavor of the final product. Be sure to rub each grain against one another while washing—this helps get rid of all traces of starch.
After rinsing, cook the rice according to the package instructions. After cooking the rice, allow it to cool until it’s lukewarm. The time it takes will vary depending on your ingredients and method of preparing it.
Next, prepare a vinegar mixture by combining together five tablespoons of rice vinegar, two teaspoons of sugar and one teaspoon of salt in a bowl. Heat this mixture until the sugar and salt have dissolved before pouring it over the cooled rice. This gives it an important balance between sweet and sour flavors that is essential for creating traditional sushi rice.
Mix this vinegar mixture in with the rice using a spatula or spoon, making sure that all of the grains are evenly coated. If desired, you can also include other seasonings such as sesame oil or nori powder. Once fully incorporated and cooled entirely, your sushi rice is now ready to be used in your rolls!
Getting the rice right is key when making sushi rolls – and with these simple steps you’ll be well on your way to creating delicious dishes! Now let’s move on to the next step in our quest for beginner’s sushi: Rolling Sushi: The Art of Making Half-Rolls.
Rolling Sushi: The Art of Making Half-Rolls
Rolling sushi is an art that requires a few basic steps and some patience and practice. A half roll (also known as hosomaki) is the simplest type of sushi roll, consisting of one main ingredient, such as tuna or cucumber, wrapped in a thin sheet of seaweed called nori.
To make a half-roll, begin by laying a sheet of nori on the sushi mat. Spread an appropriate amount of sticky rice evenly over two-thirds of the nori. Place the main ingredient horizontally along the centerline of the rice layer. Use your thumbs to push down gently and tighten the roll up around the ingredients. Finally, start rolling up from the end with rice using even pressure. Use your index fingers to guide and keep the roll tight while making sure it isn’t bulging at either side.
When preparing hosomaki, some may argue that it can be equally effective to skip the rolling process altogether and simply wrap the nori around the ingredients without the aid of a sushi mat. While this method may require less effort and fewer tools, experienced sushi chefs recommend using rolling mats for their tactile feedback when forming proper rolls that are visually appealing. Rolling mats not only provide support as you shape your half-rolls into cylinders, but they also help prevent them from becoming misshapen or unintentionally unravelling.
Transition Sentence: Now that you know how to make half-rolls, let’s look at how to wrap them with nori and cut them into perfect halves for presentation.
Wrapping the Nori and Cutting the Knife Halved Roll
Wrapping the nori is the second step of constructing a sushi roll. Nori is dried seaweed, which comes in pre-cut sheets and can be purchased from most Asian markets. Before you start, it is important to know that when wrapping a sushi roll, the rough side should face outward. This will make it easier to seal the roll when you begin to wrap.
The proper way to wrap a sushi roll is to place the nori sheet on a bamboo rolling mat so that it is centered and the long side faces you. Make sure to place your other ingredients near you before starting, as this will allow for faster assembly. Once everything is ready to go, spread a thin layer of rice evenly on top of the nori. Make sure that there is enough rice so that it reaches all four corners of the nori sheet, but not too much as it will make it difficult to roll up later.
At this point, you may have decided to make a knife-halved sushi roll. For this type of sushi, use the tip of a wet knife with a blunt edge and slice through the middle part of your prepared sushi roll. It takes practice and patience to master cutting a perfect knife halved sushi roll; if it doesn’t turn out perfectly the first time that’s okay! Once you have sliced your sushi roll in half, proceed onto folding and rolling up your maki (sushi rolls).
Now that your Nori has been wrapped, you are almost done creating an amazing sushi experience! The next step you’ll want to take is learning how to eat your delicious sushi creations. In the following section we will discuss “Eating Sushi: Learning from Recipes”, so keep reading!
Eating Sushi: Learning from Recipes
Taking the first step in knowing how to eat sushi involves learning from tried and true recipes. Recipes provide clear techniques on how to make your own rolls, as well as how to properly assemble a sushi meal. For first-time diners, this is a great place to start. There are countless online recipes for creating different kinds of maki rolls, nigiri sushi, and other varietals that come with clear instructions and pictures. Popular sushi rolls like California Rolls are debuted in these instruction sets with an easy breakdown of ingredient steps.
These internet guides often come packed with tips and tricks, such as ways to make sure your sushi stays together while you’re rolling it or creative ways to plate it; they also offer qualitative tips on what ingredients do or coordinate well with others – such as combining the flavor of eel with avocado or cream cheese. Oftentimes the recipes themselves come paired with pictures of finished meals, so you can get an idea of what a professional dish should look like.
Some debate exists between those for and against learning about sushi through online recipes. Those for online sushi tutorials argue that amateur home-chefs can easily replicate professional dishes within their own homes if they are given the correct ingredients necessary—while those against argue that you cannot learn the nuances of Japanese cooking without being fully immersed in the culture itself. Either way, learning from recipes is still a great place to start when first entering the world of sushi making.
From learning about different ingredients and instructions on how to build a precise sushi roll, venture into the next section where we will discuss “Making Your First Roll: Gradual Guide” – providing a gradual breakdown on all the necessary steps for novices looking to make their very own roll.
Making Your First Roll: Gradual Guide
It’s time to start making your first roll of sushi. The goal is to make a simple roll that uses two sushi ingredients and two sheets of nori (seaweed). Here are the steps in making your first roll:
Step 1: Prepare Your Work Area
You want to ensure you have enough space to spread out the ingredients. Place a cutting board or a flat surface on top of a damp towel. This will help the nori from sticking and provide support for the filling.
Step 2: Cut the Nori
Take one sheet of nori and fold it hamburger-style (lengthwise). This will give you four equal pieces that each measure about 4 inches wide. Carefully cut along the crease so that each piece is separated, leaving you with four equally sized rectangles.
Step 3: Spread the Ingredients
On each sheet of nori, place two tablespoons of your desired ingredients in the middle and spread it lengthwise, leaving about 1/4 inch of space at each end. It’s important to not overstuff the roll, as this can cause it to fall apart upon rolling. Don’t forget to leave room for rolling! You can also get creative and add other flavors such as mayonnaise or melted cheese if desired.
Step 4: Rolling Up Your Sushi
Now comes the tricky part; rolling your sushi. To begin, take one of the sheets of nori filled with ingredients and fold in half lengthwise so that it creates a long rectangle shape. As you are folding, make sure your fingers are pressing down and securing everything together. Once you’ve fully completed this step, pinch the bottom side together before proceeding to the next step.
Step 5: Wetting and Sealing
This next step requires you to wet your hands with water before proceeding any further. Start at the top corner of the nori and then slowly proceed towards the bottom corner while making sure everything is tightly secured inside. When you reach the edge of your roll, wet it slightly with some water before sealing it off completely by pushing firmly on both ends. If you find that there are any air bubbles formed inside during this process, gently pop them with a knife before continuing on.
Finally, when all of your rolls have been sealed properly, place them in an air tight container or wrap them with plastic wrap until ready for consumption.
CONCLUSION AND FINAL THOUGHTS:
Creating sushi at home can be both a fun and daunting task but don’t be discouraged! Having a step-by-step guide like this one can help even those who are new to making sushi feel comfortable getting started. In conclusion, take careful time when preparing all of your ingredients and rolling up your sushi for best results! Now that you have gone through this process, let’s move onto examining some final thoughts in our next section…
Conclusion and Final Thoughts
Making your first sushi roll is a surprisingly simple yet rewarding experience. With the right ingredients, the right equipment, patience, and practice, anyone can make an impressive homemade meal with minimal effort. Whether eaten as part of a traditional dinner or enjoyed as a fun snack in-between meals, sushi is an incredibly versatile culinary option to have in your repertoire.
Ultimately, learning how to make sushi is not only a great way to experiment with new flavors, but also a skill that can last you a lifetime. Sushi is an art form, and by taking the initial effort to learn it you open yourself up to endless customization possibilities. The next time you feel overwhelmed or intimidated about rolling snacks for guests at home, remember that it just takes one step at a time and the results will be worth it.
Choosing to take the plunge into the world of sushi making isn’t always easy – it requires commitment and knowledge. However, the end result is usually worth all the effort since you can successfully create rolls of your own design that taste delicious every single time. Ultimately, investing your time into learning this special cuisine will bring creative pleasure and satisfaction into your kitchen for years to come.
Frequently Asked Questions and Their Answers
What equipment do I need to make sushi at home?
Making sushi at home requires a few basic pieces of equipment. First and foremost, you will need a bamboo rolling mat. This is what you will use to shape your rolls into the traditional round shape. You will also need a sharp knife to cut your sushi rolls. Additionally, you will need some nori (dried seaweed sheets) and ideally some sushi rice– this will help ensure that your rolls have the right texture and flavor. Finally, you’ll need some fillings – whether they are cooked proteins like fish or vegetables like cucumber – to make up the inside of your roll. Once you have all these items in place, you are ready to start making your first roll!
What ingredients do I need to make a simple sushi roll?
To make a simple sushi roll you will need nori (seaweed paper), sushi-grade fish or other filling ingredients such as cucumber, avocado, and/or carrots, cooked white rice, and any other desired condiments(such as wasabi and soy sauce). First, lay down the nori sheet flat on a sushi mat. Spread a handful of cooled cooked white rice evenly across it. Place your preferred filling ingredients along the center of the nori sheet. Roll the sushi by grasping one end of the mat and rolling it towards you until you reach the opposite end. Once rolled, dampen the end of the seaweed with water to seal it, then cut into 5-8 pieces using a sharp knife. Enjoy!
What is the correct method for rolling sushi?
The correct method for rolling sushi is known as maki-zushi. This involves using bamboo mats or rolling mats to spread the seaweed (nori) sheet on, with the rough side facing up. Spread the filling ingredients over the nori and roll with pressure so that the roll holds together and becomes tightly wrapped. Once the roll is complete, press firmly along the sides of the roll and slice evenly with a sharp knife to create individual pieces. Maki-zushi is an easy way to make sushi rolls for beginners, but you can also try other methods such as hand rolls (temaki) or pinwheel rolls (futomaki). To make sure your sushi turns out perfect every time, be sure to use high quality ingredients and prepare each component properly.